How to deploy a Telegram bot to Fly.io
There will be a guide how to create and deploy simple telegram bot to free fly.io platform.
Telegram Bot
Obtain Telegram Bot Token
For Telegram bot we need a token, which will authorize our telegram bot and then willow allow it to communicate with Telegram servers.
To obtain it we need to ask a BotFather for it. Check a verification mark on bot you opened before any interaction with it.
After start with BotFather, check menu or send /newbot command and follow instructions. After all steps you will get a message with Bot API Token.
Create bot
For my telegram bot I will use python-telegram-bot package for python. You can install version used in this guide with next command:
pip install python-telegram-bot==20.0a2
Code of my, very simple, bot, placed in file called main.py:
import logging
import os

from telegram import Update
from telegram.ext import ContextTypes, CommandHandler, ApplicationBuilder


async def start(update: Update, context: ContextTypes.DEFAULT_TYPE):
    logging.warning(f'Got message from {update.effective_chat.username}')
    await context.bot.send_message(chat_id=update.effective_chat.id, text="Hello")


if __name__ == '__main__':
    assert (bot_token := os.environ.get('TOKEN')), 'Please, set environment ' \
                                                   'var TOKEN with your bot token'
    application = ApplicationBuilder().token(bot_token).build()

    start_handler = CommandHandler('start', start)
    application.add_handler(start_handler)

    application.run_polling()
I’m using PyCharm, but you can use whatever you want. To start and use code above export (on Linux) or set (on Windows) TOKEN env variable with your telegram bot token:
export TOKEN=<your bot token>
set TOKEN=<your bot token>
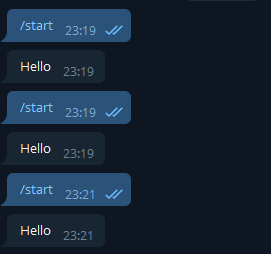
And then open dialog with your bot, press start and you receive an answer from it:
After that we need to record all packages were installed for our bot, so we can later install it on server, to do it, execute next command:
pip freeze > requirements.txt
Simple Dockerfile for our app
Docker seems a bit “overkill” for our very simple Telegram bot, but if so far easiest way to build and deploy our application.
There will not a lot of steps, because I’m don’t want to explain a lot of stuff about docker, so, if you need something a little bit more complex, you can always google additional information about how Docker images, containers and files work.
So, after little introduction, we need to create a file called Dockerfile, in root directory with our bot, with next content:
FROM python:3.9

RUN apt-get update && apt-get install -y \
    python3-pip \
    python3-venv \
    python3-dev \
    python3-setuptools \
    python3-wheel

COPY requirements.txt .
RUN pip install -r requirements.txt

COPY . .

CMD ["python", "main.py"]
Fly.io
Why Fly.io
Fly.io provides really cool free plan with a lot of features and it capable to handle a lot of stuff for free platform. You can check their pricing and terms on their pricing page.
Specs of their free plan capable to handle most of basic telegram bots we no problem, so it’s perfect platform to learn how to work with Docker, Telegram Bot API, and other stuff.
Creating Fly.io account
That’s a pretty simple process. First of all, go to fly.io website and hit “Sign in” and then “Need an account?” button. Then fill all necessary fields or simply login with GitHub account, if you have one.
You will be asked for payment details. But giving them to Fly.io is not necessary, just press “Try Fly.io for free” under form for card details, and proceed to next page of Get Started landing pages
Installing
To interact with Fly.io platform we need a special CLI utility called flyctl.
To install it you need to use command described on next page - Installing flyctl
I will try to go under Windows, so i will use next command:
iwr https://fly.io/install.ps1 -useb | iex
To install it under Linux you can use this:
curl -L https://fly.io/install.sh | sh
So, after command execution you shall be able to use flyctl from your Terminal (Command line), to check if it installed successfully type flyctl --help on Windows CMD.
Under Linux, to be able to use flyctl, you can be asked to add flyctl bin folder to PATH, so last lines of script output for instructions if command not recognized.
If flyctl --help gave you an output for available commands, then installation process was successful.
Auth to Fly.io with flyctl
To authorize your flyctl in fly.io use next command:
flyctl auth login
It will open browser tab and will ask you to login with your current account, we agree. After that we receive an confirmation of our authorization in Terminal.
Create your app
Now we need to create our app on Fly.io. In folder with main.py execute next command
flyctl apps create <your-app-name>
I will use simple-bot as app name later.
Set secret with our Telegram bot token
To provide our Telegram Bot a secret token, we can provide it to fly.io directly, so it will be automatically put into environment of our container with bot.
To do that execute next command:
flyctl secrets set TOKEN=<your telegram bot token>
Create fly.io configuration file
Then we can create an fly.io configuration file. In project root folder, near main.py and Dockerfile create file called fly.toml with next content:
app = <your-app-name>
kill_signal = "SIGINT"
kill_timeout = 5
processes = []
Deploy application
After all this actions you shall be able to deploy your application with next command:
flyctl deploy
This command will automatically build and deploy your docker container with telegram bot, and after that it will launch it in cloud.
Checking we running good
So after all that stuff, as we didn’t encountered any error, we probably want to check how everything working. So let’s go to telegram and send /start command to our bot. And also, in fly.io dashboard, we can check monitoring tab for our application and check there is logging of our messages going in logs.
